Greater Rift 20 - 4-Piece Raekor's Set Barbarian | Season 14 Starter Guide
Skills


Items
-
Head
-
 Raekor's Will
- Stat Priority: None
-
-
Shoulders
-
 Raekor's Burden
- Stat Priority: None
-
-
Amulet
-
Torso
-
Wrists
-
Hands
-
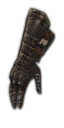 Raekor's Wraps
- Stat Priority: None
-
-
Waist
-
Legs
-
 Raekor's Breeches
- Stat Priority: None
-
-
Feet
-
Rings
-
Weapon
-
Offhand
Introduction
This is the setup that I used to clear Greater Rift 20 solo, which is a benchmark to pass to earn your third Haedrig's Gift bag in Chapter 4 of the Seasonal Journey. The third bag will complete your 6-piece set. This is specifically focused on the beginning of a new Season when Legacy of Raekor is the Haedrig's Gift for Barbarians.
Testing Circumstance for Minimum Luck
I used 0 paragon, which you would likely have a few levels of by the time you go for your GR20 and I also did not use a Follower. I crafted exactly one piece of Rare gear for each slot that didn't have a Raekor's set piece and did not roll a single affix on any piece at the Mystic. I did not have any useful items in Kanai's Cube to simulate having zero cubed items at the start of a season.
Typical/Suggested Improvements
I easily cleared the GR20 and most players could and should make a ton of improvement on the gear by cubing useful Legendary powers or finding useful Legendaries to wear/craft along the way, including converting Two-Handed Mighty Weapons in the cube to get an Immortal King's Boulder Breaker (which will help you get to the Charge speedfarming setup) or maybe crafting a Two-Handed Polearm for a chance at a Standoff. You can even do a Greater Rift below 20 and get a Bane of the Powerful, since it's always the guaranteed first Legendary gem and use that to help assist you in clearing the GR20.
However, if you're super unlucky, you can do it with this bare bones setup, as seen in the video below!
Paragon Priorities
| Movement Speed |
| Primary Stat |
| Vitality |
| Maximum Resource |
| Cooldown Reduction |
| Critical Hit Damage |
| Critical Hit Chance |
| Attack Speed |
| Resist All |
| Armor |
| Life |
| Life Regeneration |
| Area Damage |
| Life on Hit |
| Resource Cost Reduction |
| Gold Find |
-
View User Profile
-
Send Message
Posted Jun 13, 2018Funny you ask, I actually answered this in the video guide that just went live. I'd swap Ignore Pain for it, although you don't really need to. Furious Charge does all the work you need.