[S18] LoN/LoD HotA - GR 125+ - Patch 2.6.6
Skills


Items
-
Head
-
 Leoric's Crown
- Stat Priority: Skill: HotA CHC Str Socket
-
-
Shoulders
-
 Pauldrons of the Skeleton King
- Stat Priority: AD CDR Str Vit
-
-
Amulet
-
 The Flavor of Time
-
 Hellfire Amulet
- Stat Priority: CHD CHC Fire % Socket
-
-
Torso
-
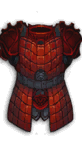 Cindercoat
- Stat Priority: Dex Socket Str Vit
-
-
Wrists
-
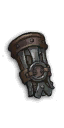 Mortick's Brace
-
 Bracers of the First Men
- Stat Priority: Fire % CHC Str Vit
-
-
Hands
-
Waist
-
 Pride of Cassius
- Stat Priority: Str Vit AR Life
-
-
Legs
-
 Swamp Land Waders
- Stat Priority: Dex Vit AR Socket
-
-
Feet
-
 Illusory Boots
-
 Boots of Disregard
- Stat Priority: Str Vit AR Skill: HotA
-
-
Rings
-
 Convention of Elements
-
 Obsidian Ring of the Zodiac
- Stat Priority: Socket CHD CHC CDR
-
-
Weapon
-
 Bul-Kathos's Warrior Blood
- Stat Priority: Dmg range AD CDR AS
-
-
Offhand
-
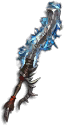
 Echoing Fury
- Stat Priority: Dmg range AD CDR AS
-
-
Legendary Gems


Kanai's Cube
-
The Gavel of Judgment

-
Bracers of the First Men
-
Band of Might

Summary:
This build centers around the Legacy of Dreams legendary gem. All items need to be ancient or primal to get the maximum effect.
This build is reliant on the combination of Cindercoat and Weapon Master with a Mighty Weapon in the Main-Hand to allow for maximum fury to be maintained at all times. This provides 100% up-time of Berserker Rage's 25% damage buff and maximizing HotA's increased crit chance based on fury. Not losing any fury during CoE's fire cycle adds a lot of damage to the build. Also, it allows you to still cause meaningful damage out of fire cycle and makes it easier to operate the build; you can attack the entire group the entire time instead of needing to aim your HotA out of the group to regain fury.
The loss of Gogok in this build because (used in Season 17 due to the Season of Nightmares buff) of Legacy of Dreams hurts, but the additions of Echoing Fury and Mortick's Brace may make this build even stronger in Season 18.
Skills:
Hammer of the Ancients - Smash
Highest damage rune for HotA, which is why the build uses fire damage. Also allows Cindercoat to reduce the cost of HotA, so you can maintain max fury for Berserker Rage up-time.
Furious Charge - Merciless Assault
Necessary for mobility and proc'ing Band of Might in the cube.
Battle Rage - Bloodshed
Massive area damage from the Bloodshed rune.
Ignore Pain - Ignorance is Bliss
The recovery of this rune is by far the best option.
Threatening Shout - Demoralize
Threatening shout reduces enemy damage to those affected, which increases your survivability. The Demoralize rune allows for easier grouping of enemies; enemies who are taunted will run at you and stay next to you even if they are ranged, which is essential to making your area damage maximally effective.
Wrath of the Berserker - Insanity
You can use any rune for this skill because of Mortick's Brace, but Insanity is used when Mortick's is not included in your build (such as when you have Aquila cubed instead).
Legendary Gems:
Legacy of Dreams (Maxed out at 99)
Bane of the Stricken
Bane of the Trapped
Armor cube slot:
Can also be Mortick's Brace if you have a near-perfect Bracers of the First Men, but I recommend cubing the Bracers of the First Men because it automatically maxes the legendary affix range in the cube and Mortick's Brace has a fixed legendary affix. If you do not have enough cooldown reduction to keep Wrath of the Berserker up ~100% of the time, Aquila Cuirass can be cubed for more damage reduction up-time.
Logic for each gear slot:
Helm: Leoric's Crown (Socket with Diamond)
Needs to be socketed with a Diamond for maximum cooldown reduction. Andariel's Visage is also decent with attack speed and %Fire damage, but the extra cooldown reduction from Leoric's Crown is a must.
- Stat Priority: Socket -> Legendary Affix -> HotA % -> CHC -> Str -> Vit
- A secondary affix with resistance is ideal, with physical resist generally being the best.
Shoulders: Pauldron's of the Skeleton King
Basically any legendary shoulder item can work if it has the right stats. Pauldron's of the Skeleton King just add the most value by giving a chance to not die when you die, essentially. I have noticed this proc dozens of times, saving my ass each time.
- Stat Priority: CDR -> AD -> Str -> Vit -> All Res -> Armor
- A secondary affix with resistance is ideal, with physical resist generally being the best.
Amulet: The Flavor of Time
The new double pylon duration affix is way too good to ignore. Is now required over Hellfire amulet because of that. Hellfire ammy is still good, though, it just needs to have one of 6 usable passives: Berserker Rage, Ruthless, Rampage, Brawler, Weapon Master, and Nerves of Steel. If the Hellfire amulet rolls one of the 4 passives listed in the build above, simply swap out that equipped passive for one of the other 4 listed passives in the build because passives will not stack. Nerves of Steel is not required because of the toughness and recovery in this build.
- Stat Priority: CHD -> %Fire -> CHC -> CDR/AD -> Str
- A secondary affix with melee/ranged damage reduction or a resistance is ideal.
Torso: Cindercoat (Socket with Diamonds)
The resource cost allows you to maintain max fury for Berserker Rage up-time. The higher the number in the affix, the better, but a low roll is not a build killer. The % fire damage is also a nice uptick in damage, and the higher the better, but with so many other items giving % fire damage, having 20% is not required. The hardest part of this item is getting it to roll 3 sockets. For some reason this item can roll anywhere from 0-3 sockets, unlike most items. A Cindercoat with 1 socket may not provide enough toughness, but a Cindercoat with 2 sockets, if rolled perfectly in every other way may be usable. You may also socket with Rubies if you find you have enough toughness and recovery to survive.
- Stat Priority: Sockets (3) -> %Fire -> Str -> Vit -> Elite Dmg Reduction -> All Res
- A secondary affix with melee/ranged damage reduction or a resistance is ideal.
Wrists: Mortick's Brace
See the cube armor slot description for reasoning.
- Stat Priority: %Fire -> CHC -> Str -> Vit -> All Res -> Armor
- A secondary affix with melee/ranged damage reduction or a resistance is ideal.
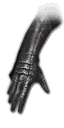
Hands: Magefist
Magefist is best for the added fire damage.
- Stat Priority: CDR -> CHD -> CHC -> AD -> AS -> %Fire
- A secondary affix with resistance is ideal, with physical resist generally being the best.
Waist: Pride of Cassius
Required for easier 100% up-time of Ignore Pain, which is required for toughness and recovery. Witching Hour is not usable because of the damage reduction needed from Ignore Pain.
-Stat Priority: Ignore Pain Duration ->Str -> Vit -> All Res -> %Life -> Secondary Max Fury -> Armor -> Life per Fury Spent
Legs: Swamp Land Waders
You need to get these from a WD. You can upgrade lvl 70 pants on a lvl 1 WD to get these. Or use all of your bloodshards on a lvl 70 WD in order to get them if you can get a power level. These will always roll with Int on them, and ideally you want strength. The best option for these is to get them to roll ancient with 20% fire damage, vitality, and all res natively, so you can roll the int to str.
The reason these are the best is the % fire damage.
- Stat Priority: Sockets (2) -> %Fire -> Str -> Vit -> All Res -> Armor
Feet: Illusory Boots
The ability to move unhindered through enemies allows for very easy re-positioning while in a crowd, and you will always be completely surrounded. The easy re-positioning is essential for moving into Oculus rings and Triune rings for Season 18.
An alternative to these is Boots of Disregard since you do all of your damage standing still, and you can use Furious Charge to relocate in a group, albeit less easily.
- Stat Priority: Hota % -> Str -> Vit -> All Res -> Armor -> Move Speed (relocate paragon to Str)
Ring 1: Convention of Elements
If you get a terribly rolled legendary affix, you want to consider cubing this if you have a Band of Might with a perfect legendary affix.
- Stat Priority: Socket -> Legendary Affix -> CHD -> CHC -> CDR -> AD -> AS
- A secondary affix with resistance is ideal, with physical resist generally being the best.
Ring 2: Obsidian Ring of the Zodiac
The legendary affix to help with cooldowns is essential.
- Stat Priority: Socket -> CHC -> CDR -> AS
- A secondary affix with resistance is ideal, with physical resist generally being the best.
Ring 3: (ideally cubed): Band of Might
The difference between an 80% reduction and 79% is actually 5% more damage taken. From 80% to 75% is 25% extra damage taken. So this is very important to have maxed out at 80%, which is why this is ideally cubed.
- Stat Priority: Socket -> Legendary Affix -> CHD -> CHC -> CDR -> AD -> AS
- A secondary affix with resistance is ideal, with physical resist generally being the best.
Main-Hand: (Almost) Any Mighty Weapon
Any mighty weapon will do for the Weapon Master passive. Mighty weapons can roll secondary max fury, which essentially increases your crit chance.
However, there are some to avoid, such as: Remorseless (you REALLY don't want to spawn a bunch of ancients who will tank enemies away from you), Fjord Cutter (no secondary max fury), Ambo's Pride (always rolls with bleed chance, which makes it harder to get the right stats), Night's Reaping (crafted item, but always rolls with life %, which makes it harder to get the right stats).
- Stat Priority: Dmg Range -> AD -> CDR -> AS -> %Dmg -> Str -> Secondary Max Fury
Off-Hand: Echoing Fury
The legendary affix attack speed is pretty essential for this build.
- Stat Priority: Dmg Range -> AD -> CDR -> AS -> %Dmg -> Str
Follower: Enchantress
Skill 1: Neither
Either one of these skills actually is detrimental to the build.
Skill 2: Either
Both of these are pretty good. Choose whichever you like best
Skill 3: Erosion
Enemies take extra damage.
Skill 4: Focused Mind
The little attack speed buff is more important than you think.
Focus: "Your Follower Cannot Die"
Weapon: The Sultan of Blinding Sand
The blind chance secondary is very nice for stunning bosses throughout the boss fight
Alternative weapons are Thunderfury (for wyrdward stun synergy) or Eun-jang-do (for boss freezing at low boss health).
Ring 1: Oculus Ring
The chance to spawn increased damage rings works while on your follower. These are way too powerful to ignore.
Ring 2: Wyrdward (if you use Thunderfury instead)
This allows the Thunderfury lightning to have a chance at stunning.
Amulet: Ess of Johan
Can help pull enemies together for you. I prefer the 60% move speed reduction over 80% just in case she pulls them into a bad spot.
Paragon Priorities
| Maximum Resource |
| Movement Speed |
| Primary Stat |
| Vitality |
| Cooldown Reduction |
| Critical Hit Damage |
| Attack Speed |
| Critical Hit Chance |
| Resist All |
| Life |
| Armor |
| Life Regeneration |
| Area Damage |
| Resource Cost Reduction |
| Life on Hit |
| Gold Find |
Core:
Max resource essentially gives crit chance to the build. With 50 extra max resource, thats 10% extra crit chance for HotA.
Offense:
All of these are extremely beneficial. But CDR is most essential of them.
Defense:
These are listed in order of most toughness gained.
Utility:
Area Damage is hugely essential for this build. The 10% RCR, however, is also necessary for maintaining max fury. Life on hit is vastly overshadowed by the life per fury spent in the build from Ignore Pain - Ignorance is Bliss and Mortick's Brace giving Wrath of the Berserker all runes, which includes Thrive on Chaos.
-
View User Profile
-
Send Message
Posted Aug 12, 2019That´s interresting with the Weapons Master passive.
Did you test it on the PTR? It seems to me you would still starve hitting 4 mobs, but not as fast, or am I missing something? HotA would still cost like 10 Fury even with RCR from paragon and Cindercoat, I guess?
-
View User Profile
-
Send Message
Posted Aug 12, 2019I did test it on PTR. I was able to do 118 on the first key, spawning boss on floor 6. With the RCR and Cindercoat, your HotA costs roughly 13 fury. So yes, technically hitting 4-6 mobs would reduce your fury, but very slowly. However, in reality this rarely happens. In most push situations you are hitting way more than 6 mobs at a time, and if you aren't, you should be moving on to larger group of trash; constantly grouping everything you come across with taunt. On S17, I am pushing GR125 with 2700 para (obviously with a slight variation in gear).