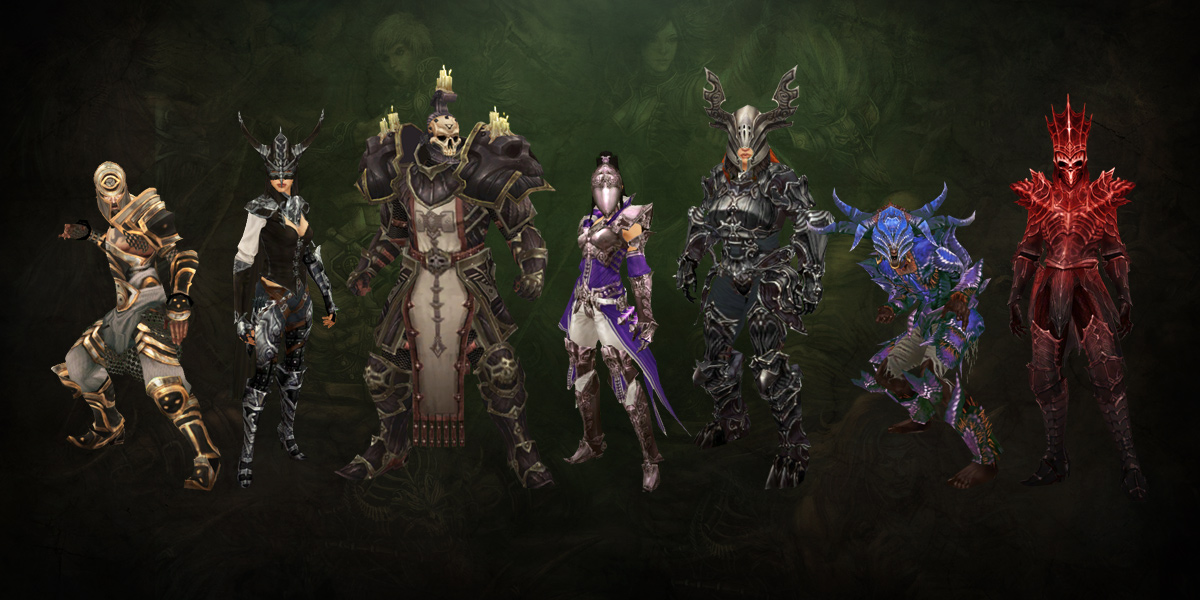
One of the hallmarks of DiabloFans is that you, our faithful readers, have developed a wide array of ways to play Diablo III. Through the utilization of our Build creation tools, it is very possible that a build you shared with the community has supplied someone with countless additional hours of gameplay and enjoyment. In this article, we'd like to take a moment to celebrate some of the more popular builds on the site and kick off 2018 in style.
Despite the dominance of Condemn tearing up the Leaderboards, players continue to see what else is out there for Crusaders. Ganfall's Blessed Shield Crusader is touted as a Greater Rift 110+ build, which brings this once beloved playstyle back to a respectable level of power. How far can you fling these shields?
ronnybonx provides a fresh take on a tried and true playstyle for the Wizards since the advent of Patch 2.6.1. In this build, bounty hunting is the name of the game. The trash mobs are mowed down with Disintegrate, while the resulting Meteors that drop take out Elite targets. If you're in need of those Legendary bounty materials, give this build a spin.
For those of you looking for a more supportive role to play in your group sessions, check out this Support Necromancer build. Rathma runs have proven to be the #1 most efficient way to gain experience since their inception, so having a deep understanding of one of the roles can go a long way. Let GradusMike be your guide!
In similar fashion to the Crusaders, the Monk Leaderboards showcase a sea of Wave of Light. Look no further if you're ready to break from that trend, at least while you farm your normal rifts and gather up those Death's Breaths. Papaklump provides a respite from the bells with a set that has mostly been relegated to support duty for Monks these days.
If you've seen a Demon Hunter running around your regular rifts, they've likely been Multishotting everything on your screen to death. Patch 2.6.1 brought Unhallowed Essence back to life in a big way, but don't sleep on the Natalya set either. Seredith has come up with a speed build for Torment 13 rifts that you just might find to be a fun alternative to the run-and-gun playstyle of the former mentioned champion build.
Thank you again to all our wonderful community members that continue to push themselves to come up with new builds and exciting ways to get those rifts cleared. Do you have any builds in particular that you've been enjoying lately? Let us know what you've been playing and how your season has been going!
Leviathan (@LeviathanD3) is a content creator for Diablo Fans and a Hardcore Crusader for life. You can likely catch him streaming high Leaderboard/Conquest rank attempts unless he's out taking photographs or discovering new music.
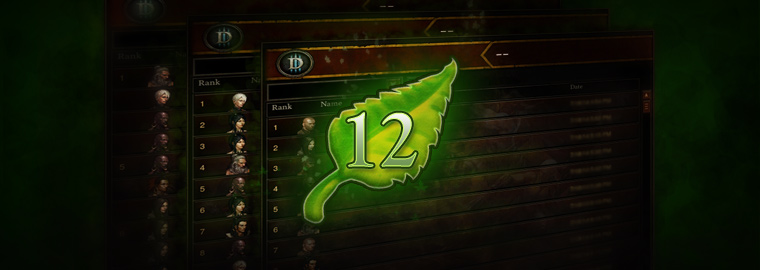
With the potential halfway point of Season 12 quickly approaching, now is a great time to take another look at the Leaderboards and see what sorts of changes, if any, have shaken up the solo builds for each class. While some classes maintain their status quo from the last time we looked, there are a few interesting newcomers to discuss. Let's go!
Remember when I said to put a bookmark down for revisiting Demon Hunter builds later? Well, welcome back to a new (old) build! This duo-set setup combines six pieces of Natalya's Vengeance with four pieces of Embodiment of the Marauder to deal out slow, steady, and deadly damage over the course of high-level Greater Rifts. Typical to Sentry-styled play, the main objective is to gather tons of enemies, let your Sentries whittle them down over time, and continue to kite the monsters around to ensure your survival. With movement, resources, and skill deployment to manage all at once, this build asks a lot of players that choose to use it, but the results are great. Clears in the high 100s range have started to pour in. Again, continue to keep your eye on Demon Hunter as even pure Marauder builds are popping up here and there with great potential.
While HOTA may have been a popular blast from the past to discuss last time around, the theme of mixed sets continues with this classic Barbarian staple. Bringing together six pieces of the Immortal King's Call set along with four pieces of The Legacy of Raekor set is nothing new. However, this season, it's performing particularly well as a high-tier Greater Rift build due to its new damage ceiling potential. While the Greater Rifts and particular Rift Guardians that it can manage will require a heavy level of fishing, it's believed that this may be the Barbarian's most capable setup. Don't count out Wrath of the Wastes Whirlwind builds though, as they have emerged at the tail end of previous seasons and could vie to unseat the Charge Barb.
While the channeling Meteor builds (both Firebird and Tal Rasha flavors) continue to occupy many of the top Greater Rift clear spots for Wizards, another non-Archon-centered build has entered the fray. Yes, Delsere's Magnum Opus and Arcane Orb - Frozen Orb have united to push Wizards forward with another GR110+ capable build. The playstyle for this build puts the Wizard at range, taking advantage of the double explosion properties of the Frozen Orb at the end of its travel path. Smart positioning and good mob management are the keys to victory here. If you'd like to take a break from dropping Meteors on demon heads, give this powerful alternative a serious look.
As previously discussed, the way to the top as a solo Necromancer is through a sea of Corpse Lances, supported by the Pestilence Master's Shroud set. However, another build all DPS Necromancers should be well-versed in is the Rathma Skeletal Mage setup, utilizing the Singularity rune on the Mages. This particular build is the infamous destroyer of "Rat Runs". For those not quite familiar, Rat Runs are a speed composition for 4-player groups that, when run correctly, yield the highest amount of experience a player can gain per hour. The four members of the party are Support Barbarian, Support Necromancer, and two Rathma Skeletal Mage Necromancers. This quad squad rolls as one unit through the rift, hurrying from elite to elite, and murdering anything that gets in the way of that endeavor. The runs can clear Greater Rifts 95-105 in an average of 3 minutes. If you're aiming to achieve your highest Paragon level yet, familiarize yourself here and go forth as a Rat.
Witch Doctors really haven't seen much in the way of diversity in their Greater Rift clears. Arachyr Firebats continues to dominate the solo Leaderboards and also simultaneously cements its place in the 4-player Greater Rift pushing meta. Other setups, like Jade Harvester, may be worth watching as they have cleared some decently high Greater Rifts, too, but for the ease in one stop shopping, you can't beat Arachyr and the spinning bats. This particular version is tuned for dominance in 4-player groups and will undoubtedly be a part of the highest group clear that we see by the end of the season. We highlight this build because...
...those Witch Doctors don't go anywhere without their Support Monks. Sunwuko Wave of Light continues to dominate the best Monk marks when it comes to solo Greater Rifts (and also when it comes to speedfarming regular rifts), so there isn't much news to report there. However, the Support Monk continues to be a mainstay in the 4-player Greater Rift pushing meta. Introduced after the destruction of the Support Crusader and Support Witch Doctor, Support Monk has had a presence in one way or another when it comes to high-tier GR clears. Familiarity with this build will grant you a place in parties that take your Legendary gems to their highest heights, which will support both your augmenting as well as your solo pushing builds. Hold that Witch Doctor's hand and destroy all the things.
Condemn is still king. All hail Condemn. The Akkhan set does still have room to support other builds though and another antiquated and quite popular build was the Holy Shotgun Crusader. Utilizing Fate of the Fell and now in its reborn iteration the Ivory Tower, this build is on the opposite side of the spectrum from Condemn. It's much tankier and doesn't dole out all of its damage right away. Instead, another shield introduced after the irrelevance of the original Holy Shotgun, the Shield of Fury, grants this build its ultimate power in providing an uncapped stacking mechanic that makes each hit of your Heaven's Fury more powerful than the last. Patience and fishing will allow you to take this build higher up the Greater Rift chain, but it likely will never hold a candle to Condemn. For the sake of variety, though, this is a very different option you may choose to explore.
Thus concludes our mid-season dive into what our heroes have been up to. Are there any builds that you're finding particularly awesome? Some build you'd love to see receive more love? Tell us in the comments section! Sharing is caring after all.
Leviathan (@LeviathanD3) is a content creator for Diablo Fans and a Hardcore Crusader for life. You can likely catch him streaming high Leaderboard/Conquest rank attempts unless he's out taking photographs or discovering new music.
Season 12 is only two weeks old, but players have already blown away marks and goals that would have taken them nearly an entire season in the past. Yes, the new level of power granted in Patch 2.6.1 is very real and certain builds are showcasing that quite spectacularly on the Leaderboards. Let's take a look at the most popular builds currently topping the charts for each class.
Taking advantage of the buffs given to items that support channeling skills and Meteor, we currently see the Tal Rasha Meteor build leading the way for Wizards. This setup delivers disgustingly large amounts of damage under the right circumstances. Previously, Tal Rasha's had a place for Wizards when it was mixed with the Vyr's set, but now it truly gets to stand on its own with a high clearing Greater Rift build that should stay competitive deep into Season 12.
Resurfacing as a blast from the Season 4 past, the updates to Immortal Kings and all of the items that support Hammer of the Ancients have seen this fan favorite rise to the top. HOTA once lived a life that was best paired with a support Monk, giving it the healing necessary to survive, but in the current season, this build is tough enough to go it alone and take on high-level Greater Rifts. However, unless you plan to be true to Hammer of the Ancients all season long, make sure you keep an eye on the Furious Charge and Whirlwind setups, as they will also be clearing competitively high Greater Rifts.
Looking to be simultaneously the most popular and flashiest build currently running around Season 12, the bell tolls for all Monks. Sunwuko Wave of Light has become a devastating way to not only clear the highest of Greater Rifts, but also helps Monks contest the crown of fastest Torment 13 Nephalem rift clearer. With a couple of variations currently existing for this build, it will be interesting to see if any alternatives arise to challenge this ranged destroyer deeper into the season.
We knew that the top Necromancer build would be a Corpse Lance setup; we just didn't know which set it would revolve around. So far, it looks like it's out with the old and in with the new, due to the amazingly high single-target damage output of the Pestilence set. Not only is this the chart topper for solo Necromancer play, but current 4-player Greater Rift Guardian killing also takes up the Pestilence set for its Corpse Lance deliveries. With the highest Greater Rift clear across any class currently belonging to the Pestilence Corpse Lance Necromancer, look for this set to only become more dominant deeper into the season.
To celebrate this phenomenon, we need to go even deeper into the seasonal history books. Remember Season 1? Season 2? The Crusader didn't have too many choices back then, so Condemn was overpowered by default. Now with some of the most diverse options ever available to the class, Condemn has finally returned as a decimating AOE powerhouse. Rolling through Greater Rifts is a harrowing affair, as this squishy build lives and dies with one right or wrong move. However, the damage output in high density scenarios is exquisite. We will see whether Condemn stays on top as its damage ceiling is phenomenal, but other builds such as Blessed Shield or even the recently dethroned Blessed Hammers may have something to say about the top spot.
Put a bookmark here to revisit Demon Hunter builds later in the season. Shadows Impale has famously been one of the fastest to start builds due to the addition of the legendary power to Holy Point Shot and the ease with which one can craft a Karlei's Point. When gearing up is that simple and the setup deals enormous amounts of damage with little need for optimization, it makes perfect sense to see this build dominating the Leaderboards early in Season 12. However, Demon Hunters seem to be one of the more evenly balanced classes among their set buffs, so don't be surprised if Multishot, Grenades, or even Natalya's comes knocking in a few weeks for those high rankings.
Last but not least. a longtime meta stronghold has reclaimed its spot. For two shining seasons, Legacy of Nightmares Spirit Barrage sent Arachyr Firebats packing, but now, due to the set and item buffs of Patch 2.6.1, it would seem the Witch Doctor is spinning (bats) to win again. Witch Doctors have also continued to secure their placement in the 4-player Greater Rift meta as the trash killer with this same Arachyr Firebats playstyle. Early reports have noted that the server optimizations done for 2.6.1 seem to have eased the laggy woes of groups that utilized the strong area damage output of this build, but we will keep an eye on this as groups push higher and enemies hang around for longer.
That's a wrap for our early look at Season 12's most popular and powerful builds. Don't see a build you're playing up here? Think there's a build that will surprise everyone and take the Leaderboards by storm? We want to hear about it! Hop into the comments and let us know which builds you're enjoying this season.
Leviathan (@LeviathanD3) is a content creator for Diablo Fans and a Hardcore Crusader for life. You can likely catch him streaming high Leaderboard/Conquest rank attempts unless he's out taking photographs or discovering new music.
Patch 2.6.1 is shaping up to be one of the most highly anticipated updates to the game due to the sheer number of builds that will soon become viable again. Players that enjoyed some of the first top-notch builds when class sets were in their earlier stages of development will certainly be reliving those glory days again. Don Vu, Game Designer, made this intention of the development team clear in the latest Developer Chronicles and it would seem that the masses deem the efforts successful. Continue onward for just a few of our favorite class set highlights that we've experienced on the PTR so far.
1. The Return of Multishot
Demon Hunters have much to celebrate upon the release of Patch 2.6.1. One of their most beloved setups, Unhallowed Essence Multishot, should be making a furious comeback as the de facto speedfarm build for both Torment 13 rifts as well mid-tier Greater Rifts. Players should also be able to transition it into a high Greater Rift clearing setup due to the sheer power output granted by the multipliers given to Yang's Recurve's Legendary power (now boosts Multishot by 150-200%), Deadman's Legacy's Legendary power (also boosts Multishot by 150-200%), and the improvement to Unhallowed Essence's 6-piece set bonus (Your generators, Multishot, and Vengeance now deal 100% increased damage - up from the 40% on the live servers - for every point of Discipline you have). You also have improved defense with the Wraps of Clarity boosting your damage reduction by up to 50%.
2. Barbarians Become Immortal Kings
While Whirlwind and Wrath of the Wastes seem to be the hottest topics for Barbarians over the last couple of seasons and in recent times, one of the other highly anticipated Barb changes resides in the return of Hammer of the Ancients. Coming into prominence during Season 4 after the first redesign of the Gavel of Judgment, HOTA Barbs utilized the Immortal King's set to dish out their punishment. In Patch 2.6.1, the Gavel of Judgment has been updated yet again to gain a multiplier for Hammer of the Ancients (600-800%) and the Bracers of the First Men also received an update to their support of this playstyle with a 400-500% multiplier to Hammer of the Ancients. Not to be forgotten, the IK set has had its 6-piece set bonus increased to 1500% bonus damage, so all of these in combination should have HOTA Barbs going quite high into the Greater Rift upper echelon. You'll likely also see the Gavel of Judgment cubed in favor of equipping The Slanderer and Little Rogue weapon set for their increased attack speed, damage, and defense bonuses.
3. Non-Archon Wizard Options
Wizards have been begging for builds that don't use Archon since the rework to Manald Heal made the Lightning Wizard one of the strongest builds in the game period. Well, Wizards, your prayers have been answered in Patch 2.6.1 as both Delsere's Magnum Opus-based builds as well as channeling-based builds have both seen major buffs. Much excitement was shown when the PTR first launched as Delsere's received multiple updates by way of its ancillary items:
Orb of Infinite Depth
Each time you hit an enemy with Explosive Blast your damage is increased by 8-10% and your damage reduction is increased by 20% for 6 seconds. This effect can stack up to 4 times.
Unstable Scepter
The damage of Arcane Orb’s is increased by 350-450% and its explosion triggers an additional time.
Triumvirate
Your Signature Spells increase the damage of Arcane Orb by 300-400% for 6 seconds, stacking up to 3 times.
With an increase to the 6-piece set damage bonus for DMO moving up to 3800% and the Frozen Orb rune of Arcane Orb receiving generous love to the tune of 950% weapon damage, look forward to this build doing major work for Wizards at high-tier Greater Rifts.
4. Witch Doctors No Longer Jaded
Another fan-favorite, Witch Doctors have been longing for a way to play their Jade Harvester setups without feeling like a swift wind will remove all of their hit points instantly. The developers listened and in 2.6.1, Jade delivers devastating destruction while still being able to live long enough to tell the tale. A cavalcade of changes makes this build sturdier and deadlier than ever: a.) Soul Harvest will now refresh all of its stacks even when you're only Soul Harvesting one target; b.) Creeping Death was boosted to 16,800 seconds; c.) the 2-piece set bonus of Jade Harvester was buffed to 560 seconds worth of Haunt damage; and d.) the 6-piece set bonus of Jade Harvester was given a 50% damage reduction for 12 seconds after casting Soul Harvest along with a boost to your damage over time skills instantly dealing 1400 seconds worth of remaining damage. Even though it looks like Firebats builds will also be a popular way to play Witch Doctor next patch, both out of the Helltooth and Arachyr sets, it does seem like we'll be saying goodbye to Legacy of Nightmares Spirit Barrage and witnessing a healthy competition for top-tier Witch Doctor Greater Rift builds, along with a change up to the trash killing meta in 4-player groups.
5. Akkhan? I Can! Blessed Be The Shield
Ever since the Developer Chronicle blog on the Akkhan set, Crusaders have been wondering when some of their most classic builds would be viable again. While Akkhan received small attention over the last few patches - the addition of the Talisman of Akkhan and a small damage reduction added to the 6-piece set bonus - this PTR provided great improvements to the set, giving the 6-piece bonus a real damage reduction of 50% and also boosting the damage bonus up to 1300%. With such a strong base to work from, any multipliers adding into the mix from there would only further bolster the builds of old such as Condemn and Blessed Shield. Those multipliers were provided in spades with the Blade of Prophecy (max of 800% multiplier for Condemn), Frydehr's Wrath (max of 800% multiplier for Condemn), Gyrfalcon's Foote (max of 350% multiplier to Blessed Shield), and Jekangbord (max of 300% multiplier for Blessed Shield). As such, Crusaders will now have a veritable powerhouse when it comes to Torment 13 speedfarming in Akkhan Condemn, which can also be combined with the Sage's Journey set for additional Death's Breaths, as well as new entries for high-level Greater Rift pushing. Blessed Shield should be the sturdier of the two in that realm with the opportunity to cube the Aquila Cuirass, making a big difference in its safety versus the squishier Condemn setup.
There are plenty of other changes for both the classes I covered and the classes I didn't even get to mention here, so leave a comment and let us know what you're most excited for. Patch 2.6.1 should be here relatively soon!
Leviathan (@LeviathanD3) is a content creator for Diablo Fans and a Hardcore Crusader for life. You can likely catch him streaming high Leaderboard/Conquest rank attempts unless he's out taking photographs or discovering new music.
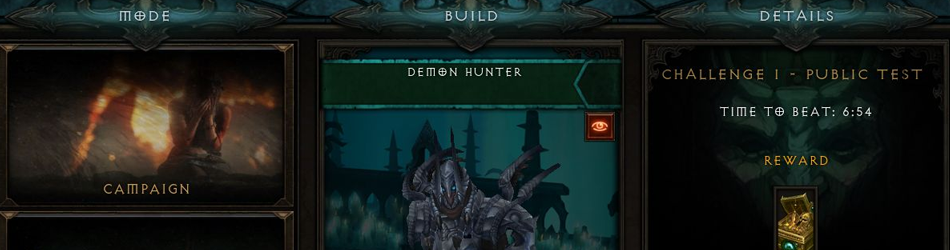
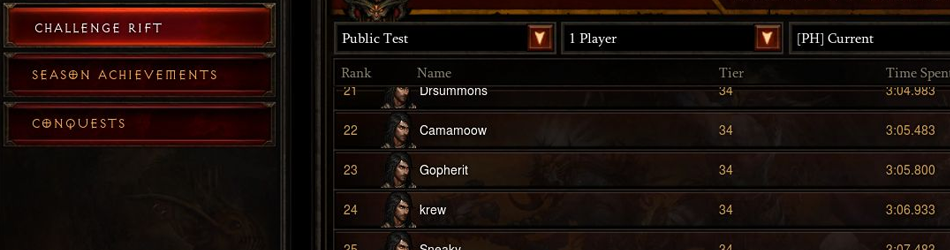
Challenge Rift Weekly - Bones of Rathma Necromancer
In this weekly column, we'll be taking a deep dive into the Challenge Rift for the Americas. We'll compare this Challenge Rift to previous ones for the class (as well as previous Challenge Rifts in general) while providing you with tips on how to beat the original time and tactics to help you climb the Leaderboard. Let's get started!
Build Breakdown
Gear
This week's Challenge Rift is brought to you by a Bones of Rathma Necromancer, which means we're all about those Skeletal Mages and anything that helps support pet play. The gear chosen by the original player is mostly spot on for what you would typically want. They have the full 6-piece set of course, with rolls that help support the Skeletal Mages do better damage (Attack Speed and Area Damage, for example). There are also several instances where they made the intelligent choice of rolling Armor on their gear, since Intelligence classes will want to diversify their defense due to having an abundance of All Resistance from their main stat.
The level of Greater Rift here is a 45 (which is the same as last week's Challenge Rift and maybe represents the new standard Blizzard is aiming for), so the choice of the Endless Walk set doesn't get to fully shine since you kill everything a little too quickly to want to stand still all that often. The Reaper's Wraps, however, are a clutch inclusion, as you really want to pour as many points of Essence into your Singularity Skeletal Mages (more on that in the Skills section) and being able to convert all the Health Globes that you'll be generating into Essence feeds nicely into that gameplay. Our other ring is a Krysbin's Sentence, which is crucial for any Necromancer that wants to do appreciable damage.
The more peculiar gearing choices include a Krelm's Buff Belt, which usually doesn't see much play except for speedruns when you're doing the Conquest to clear Acts I-V in under an hour, but it's likely that the original player was still on the hunt for better pieces of gear. This become more apparent when we look at the weapon, the Funerary Pick, which has zero synergy with the build. It's just an Ancient stat stick in this case. We also have a Lidless Wall, which actually is kind of nice for boosting the Physical elemental damage, but I'd guess that these last two choices are just placeholders until this player finds their Jesseth set items.
Skills
The skills all make sense. The Rathma set requires you to use Skeletal Mages to build up your 6-piece set bonus damage, and one of the strongest runes by far is Singularity, so I approve of this player building around that. Bone Spikes with Sudden Impact will help generate Essence and proc stuns to trigger Krysbin's Senetence, while Blood Rush with Metabolism helps us move through the Greater Rift faster, especially on the first floor with all of the walls that we can pass through. Command Skeletons with Freezing Grasp is another source of activation for Krysbin's Sentence, and it also benefits from the 6-piece set bonus, making them great ancillary damage dealers.
A nice combo is introduced with Land of the Dead - Frozen Lands and Devour - Devouring Aura. Due to unreliable cooldown reduction in the build, you won't have a lot of uptime on Land of the Dead, but when you do activate it, not only will all enemies be frozen and eligible for your Krysbin's Sentence bonus damage, but the Essence will also pour in due to the constant corpse consumptions. This allows you to keep very beefed up Singularity Skeletal Mages raining down on your enemies. Crunching all the corpses will also generate plenty of Health Globes due to the Life from Death passive, which in turn gives you more Essence thanks to Reaper's Wraps. Such synergy!
The other passives are all great choices as Final Service gives you another chance at life (at the cost of your Command Skeletons though), Overwhelming Essence increases your maximum Essence that you can pour into the Skeletal Mages, and Extended Servitude keeps those Skeletal Mages around longer.
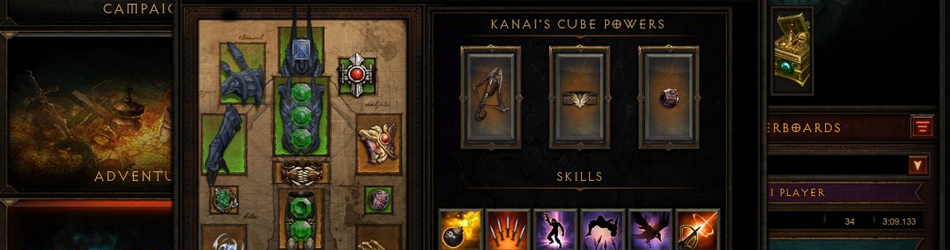
Kanai's Cube & Legendary Gems
Let's analyze the Legendary gem choices and the Kanai's Cube powers. The gems are all above the Rank 25 threshold, which is nice to see. We have:
Rank 35 Enforcer, which makes perfect sense when you're playing with pets;
Rank 35 Esoteric Alteration, which will provide some extra defense to the squishy Necromancer; and
Rank 25 Bane of the Powerful, which improves your damage throughout the Greater Rift and assists with hunting the Elites down faster.
In the Cube, we have the following:
Reilena's Shadowhook, which will provide us with increased damage in relation to our Maximum Essence. If you recall, our Maximum Essence is being boosted by the Overwhelming Essence passive, but this player also took it further by maxing out Paragon points in Maximum Essence. They also have a Maximum Essence roll on their Lidless Wall (but not on the Funerary Pick). Additionally, there is a little more synergy with the increased Essence generation that we'll get from using Bone Spikes as well.
Steuart's Greaves will provide us with a speed boost for a couple of seconds after we Blood Rush. This is a nice utility item for speedfarming, but ideally, a pet build would want to see Tasker and Theo here. It's likely the original player hadn't come across those gloves just yet.
Circle of Nailuj's Evol, which is a necessary inclusion when you're playing Rathma's set. This will help you produce an additional Skeletal Mage per activation of the skill, which is pretty insane when you're using all of your Essence to make one. This ring power also gives your Skeletal Mages extended duration, so that they'll hang out with you longer.
Playing The Challenge Rift
The original time for the owner of this Challenge Rift is 6:01. That's not too bad and seems to be a little on the quicker side of what Blizzard has been aiming for in past Challenge Rifts. There is PLENTY of room for improvement in this Challenge Rift though, so don't worry. Beating the time will not be hard.
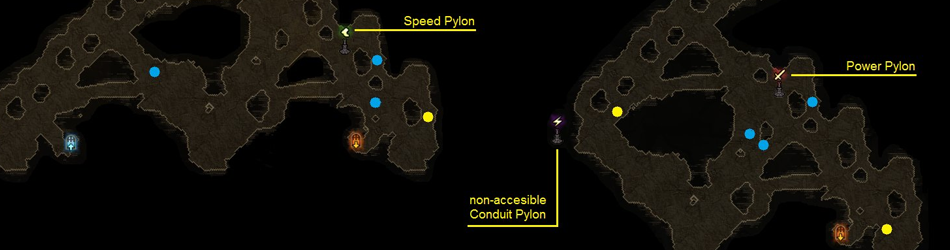
The best recommendation is to make sure that you're Blood Rushing in clever ways. If there's a wall between you and a good chunk of density, don't take the long way around. Blood Rush right on over. There are two pylons on the first floor - a Power to the north of your starting location and a Speed to the right of the Power. I would use a route that leads you that way and kill whatever you meet along the way. You'll run into several Elites on this path, and as long as you're constantly making good-sized-in-Essence Skeletal Mages, you should be ripping through the trash and only needing a few hits on the Elites. I would suggest only making Skeletal Mages when you have about 3/4 to a full bulb of Essence, although you can make some lesser powerful ones along the way, too, if you just want to keep your numbers up.
The second floor has really nice trash mobs as far as progression goes and a Conduit pylon. It's also a relatively straight shot, so if you explore it all, you'll find everything you need and you should be able to spawn the Rift Guardian on this floor. If not, there is an Elite shortly after the door that brings you to the third floor, and surely by then you'll have enough to spawn the Rift Guardian. If you have a decent amount of Skeletal Mages out by the time the Guardian pops up, it should only live for a couple of seconds, as the single-target damage here is great.
Make sure to pick up any Health Globes you see on your path, but without wasting too much time, to help you keep the Essence coming in. Use Land of the Dead when you think you'll be able to get it activated on two Elite packs. I like to personally use it right at the start just to get things going and then at some point on the second floor.
That's really all there is to it! Here is a video of sVr_90 running what is currently the fourth best time for this week's Challenge Rift:
Let's Compare
So, how does this week's Challenge Rift stack up to previous efforts? I feel this is yet another solid selection. I personally am not a huge Necromancer fan/player currently, but Bones of Rathma is a pretty straightforward set and playstyle, so this makes for a Challenge Rift that is easy to play. The Greater Rift in particular here is a bit interesting because the first floor is so labyrinthine that it provides you with many different routes that could be faster or slower. That's potentially both good and bad, depending on which side of the coin you're on.
The second Challenge Rift that we had in the Americas was an Inarius Corpse Explosion Necromancer. That build made sense for the most part, but the Greater Rift itself had a lot of technical aspects to it that made it tough to bring out the fastest times. Comparing this week's to that one, that previous one was more challenging. It boils down to which you prefer either as a competitive player or someone that's simply just trying to get their Challenge Rift cache and get back to whatever they were doing previously. Both were fun to play, but I personally preferred Week 2.
Comparing this Challenge Rift to the others that we've had in the Americas, I feel it's probably in the Top 3 or 5. Again, it helps that the build makes a lot of sense and that the Greater Rift isn't too difficult to navigate. Players will likely enjoy this Challenge Rift, and that goes a long way to catapulting it over some of the previous entries. My most basic criteria for judging successful Challenge Rift entries are seeing if the build is easy to operate for your average player and if there is still complexity left for players that want to min-max every bit of utility to achieve the fastest times. This Challenge Rift definitely nails the former and does a decent job with the latter, so I'd give it a B+!
Check out our previous coverage of other Challenge Rifts:
Have you tried this week's Challenge Rift? Were you able to earn your Challenge Rift cache right away, or did it take you a few attempts? Have any other tips that I missed? Feel free to sound off in the comments and let us know what you think!
Leviathan (@LeviathanD3) is a content creator for Diablo Fans and a Hardcore Crusader for life. You can likely catch him streaming high Leaderboard/Conquest rank attempts unless he's out taking photographs or discovering new music.
Greetings, nephalem! Leviathan here! In this weekly column, we'll be taking a deep dive into the Challenge Rift for the Americas. We'll compare this Challenge Rift to previous ones for the class (as well as previous Challenge Rifts in general) while providing you with tips on how to beat the original time, and tactics to help you climb the Leaderboard. Let's get started!
Build Breakdown
This week's Challenge Rift sports a Demon Hunter rocking the classic Unhallowed Essence setup with standard Multishot accessories. All of the old standbys are present; the full Unhallowed Essence set, the Yang's Recurve bow, and the Deadman's Legacy quiver. However, the gear choices do start to deviate from the norm in the other ancillary slots and jewelry selections. There is no Focus & Restraint, a generic amulet, and Ancient Parthan Defenders, despite no reliable way to benefit from their Legendary power. The belt is also pretty puzzling, as Grenades is certainly great with Unhallowed Essence, but is not featured here, and therefore makes the Hellcat Waistguard a simple stat stick rather than anything transformative or build-defining.
The skills are all traditional for the Multishot setup as well, with every selection feeling right except for the Archery passive. One might swap that for a more synergistic damage passive like Thrill of the Hunt or — in the case of this build, in particular — maybe even something more defensive, since the setup has a rather "glass cannon" feel to it. One thing to note is that without the Focus and Restraint combination, the generator loses much of its utility, as many of the choices in this build make Hatred regeneration a non-issue, and Discipline is recoverable through judicious Vault usage and smart Preparation presses.
Let's analyze the Legendary gem choices and the Kanai's Cube powers. The gems are all underleveled, save for the Bane of the Powerful. As a result, you don't gain any benefit from Bane of the Trapped with no source of Slow effects in the build, and the Bane of the Stricken, while useful in high-level Greater Rifts, gets no opportunity to shine in this Greater Rift 45. Thus, your only concern, gem-wise, should be cleaning up minions against any Rare Elites to make sure you're maintaining the buff from your Bane of the Powerful. In Kanai's Cube, we see the classic Dawn, which vastly reduces the cooldown timer on Vengeance, Cindercoat, which allows for massive spamming of Multishot with little to no impact on our Hatred, and Obsidian Ring of the Zodiac, which brings back any skill that's on cooldown much quicker and can be utilized with this build to provide 100% uptime on Vengeance and nearly the same for your Companion - Wolf activations.
Playing The Challenge Rift
The original time for the owner of this Challenge Rift is 5:20, which is actually the quickest time to beat we've seen since the inception of Challenge Rifts. However, that shouldn't be too intimidating as the Greater Rift itself is favorable to fast completions. As long as you are Vaulting regularly, taking advantage of Tactical Advantage for the movement speed bonus, and keeping good uptime on Vengeance and Companion, you should smoke this GR and likely land a time in the 3-4 minute range. Optimizing from there requires precise movement and key utilization of the Power and Conduit pylons located on the second floor.
As previously mentioned, this version of the build is particularly glass cannon, so make sure to keep moving so that you don't get hit by any stray projectiles, especially on the first floor. Your damage output with all buffs active should be more than enough to kill non-elites in two or three Multishots, critical hits pending, so most threats should be dead before they get to you. This is classic Multishot tactics. The Shield pylon on floor one also affords you some leeway to stand still for a bit and get more Multishots out.
If you're unfamiliar with Unhallowed Essence, do keep in mind that the 6-piece set bonus that makes your Discipline feed into your damage output relies upon your CURRENT Discipline. This means that if you just spent the last 10 seconds Vaulting and nearly depleted your Discipline, you'll do next to no damage, despite still having the same maximum Discipline. This is different, for instance, from other mechanics you might be familiar with. like the Legendary power on Reilena's Shadowhook for Necromancers, which is only concerned with your Maximum Essence. As such, use Preparation to keep your active Discipline high for the best damage output possible.
Here is a clip of Garfm showcasing one of his early attempts at the Challenge Rift for a look at what a faster clear entails:
So, how does this week's Challenge Rift stack up to ones gone by? In my personal opinion, this selection continues to move in the right direction: builds that are fun to play, while still being a little off the beaten path. Yes, you may argue that the build is essentially a copy of the standard Unhallowed Essence Multishot, but the Kanai's Cube choices and lack of staples like Focus and Restraint certainly make for a bit of a different approach to get the most out of the setup.
In the debut week of Challenge Rifts, the Americas had a Shadows Impale Demon Hunter that was quite close to the standard, cookie-cutter version. However, the major difference then was that one of the key components of the build — its mobility — was ripped from the Challenge Rift offering when the original player failed to utilize a Chain of Shadows belt. It made those of us with months of Shadows Impale experience scratch our heads a bit as we figured out ways to conserve Discipline throughout the Greater Rift. With that in mind, I'd rate this Demon Hunter Challenge Rift a peg above that one.
Comparing this Challenge Rift to the other entries for the Americas more broadly, I'd say it's obviously much better than that Monk atrocity (which we still haven't quite recovered from) and about on par with the Crusader Seeker of the Light Challenge Rift from last week — the latter of which I'd argue was the best Challenge Rift offering until this week's appeared. I think Challenge Rift entries are at their best when they have a friendly ease of operation that your average player will be able to contend with, while still supporting a bit of complexity in terms of min-maxing every bit of utility to achieve the fastest times. This Challenge Rift seems to meet that criteria nearly spot on, so I give it an A, and we'll see where we go from here!
Have you tried this week's Challenge Rift? Were you able to earn your Challenge Rift cache right away, or did it take you a few attempts? Have any other tips that I missed? Feel free to sound off in the comments and let us know what you think!
Leviathan (@LeviathanD3) is a content creator for Diablo Fans and a Hardcore Crusader for life. You can likely catch him streaming high Leaderboard/Conquest rank attempts unless he's out taking photographs or discovering new music.
Season 11 Featured Builds - Haedrig's Gift Edition
Season 11 is officially upon us and, as such, it's time for a refresher on which builds will be the most relevant for your needs. Early in the season, you should be striving to complete Chapters II, III, and IV of your Seasonal Journey as soon as possible, so that you can claim your Haedrig's Gift rewards and earn a free 6-piece set for your class. Below, we'll highlight one build per class that revolves around the set you can earn, so that you can hit running straight away!
First up, we must highlight the Necromancer. You're likely to run into many players wanting to give the newest hero of Sanctuary a try. Maybe you're one of those players? Most Necromancers will be decked out in the Bones of Rathma set in the early season, since that's the Haedrig's Gift reward for the class. While a majority of the Necromancer's best builds currently seem to be based around the Trag'Oul's Avatar set, do not sleep on Rathma. This build focuses on the set's synergy between Command Skeleton and Skeletal Mages, and utilizes the Jesseth Arms set to really push out maximum DPS for your minions. Melancholy also provides a write-up that helps you shift this build towards quick completions of Torment 13 rifts, so you should be all set if you want to stick solely with Rathma for high level Greater Rifts and speedfarming alike.
Next, we must go to the Wizard. By far, this class was one of the most popular in Season 10 due to its ability to speedfarm Torment 13 rifts and bounties in the blink of an eye, participate in the 4-player meta as a boss killer, and also push some of the highest solo player Greater Rifts. The Wizard is ready for any task and in Season 11, and she'll be pushed faster sooner due to the Tal Rasha's Elements set being awarded via Haedrig's Gift. While the best builds don't use Tal's on its own, it is often the main base, meaning you'll need a majority of Tal's pieces to get the 6-piece bonus, and then supplement that with Vyr's to kick things up a notch — like Maniax_83 does in this build. While the build is titled for Patch 2.4.3/Season 9, this particular guide was updated right before Season 10 dropped in March of this year, and nothing too significant has changed in Patch 2.6.0 to prevent Wizards from being incredibly quick T13 farmers.
The Demon Hunter is a perennial favorite for players that want to blitz through their Seasonal Journey and earn the stash tab up for grabs at completion of the Conqueror tier. This season will be no exception, as the Haedrig's Gift reward is the Unhallowed Essence set. The build showcased here is the Danetta's set Grenades variant, which is great for Torment 13 speedfarming, Greater Rift speedfarming, and even high level Greater Rift solo pushing (with a few modifications). The ease of use in this build also makes for some nice "Netflix and chill" execution and should lead the Demon Hunter to a favorable start at the beginning of Season 11. Look no further than here and BigJohnasty's noted variants if you want to do everything the Demon Hunter needs to do from the comfort of your starter set.
A mainstay of high level Greater Rift completions for multiple seasons now, the Raiment of a Thousand Storms set will be the Haedrig's Gift reward for Monks in Season 11. While this set doesn't lend itself to Monks speedfarming at their fastest, it's still easily one of their best options for pushing to the top of the Leaderboards on solo Greater Rifts. IveGottenSoLucky spells out exactly what you need to be successful with this rather squishy build, and shows its potential with a video where it's used to clear a Greater Rift 95. You can use this gifted set early in your season to attain Conquest benchmarks like clearing Greater Rift 75 solo done expediently, while unlocking your chance for Primal drops with a Greater Rift 70 solo clear en route.
Barbarians have gotten a bad rap lately as the class that clears the lowest high tier Greater Rifts for their solo clears. While they might lag behind the output of classes like the Wizard, Crusader, and now Necromancer, unto themselves, the options for the class are actually pretty well balanced. However, in recent times, Wrath of the Wastes has been emerging as the go-to set for high Greater Rift clears. This is the Haedrig's Gift reward for Barbarians in Season 11, and outside of its prowess in high GRs, it can also get some work done for Torment 13 speedfarming. LordFluffy put together a build that almost feels reminiscent of old school Whirlwind Barbarians, using Focus and Restraint activated by Merciless Charge and Whirlwind to amp up its damage output. For those of you that love spinning to win, you'll find yourself right at home starting the season with a Barbarian.
The Crusader is in a bit of a quandary with Roland's Legacy serving as its starter set from Haedrig's Gift. While Roland's has quietly been an unpopular, yet moderately successful set for Crusaders, the issue is a bit more forced this time around as it's likely the first setup players will have in Season 11. This Fire Sweep build brought to you by Shaddow should at least give you a good direction to take your Crusader in, while you continue to farm some of the more traditionally successful setups like Seeker of the Light with Blessed Hammer, or the Legacy of Nightmares Bombardment build. In general, there are ways to make Roland's work for you, but you'll have to work harder than with other setups that can accomplish the same tasks more easily.
Last, but certainly not least, we have the Witch Doctor, which will be receiving the Helltooth Harness as its Haedrig's Gift set. Helltooth Gargantuan used to be one of the most reliably powerful pet setups for the Witch Doctor, but it has fallen by the wayside in the wake of Zunimassa buffs and the discovery of the Legacy of Nightmare Spirit Barrage build last season. However, you'll have this set at your disposal early on and grilledchiz wants to help you get your speedfarming together in order to farm the pieces for some of those higher tier builds. This setup utilizes the Manajuma's Way set as well, which is one of the few reliable methods to increase the Witch Doctor's speed. This class is one of the least efficient at speedfarming when compared to its colleagues, so you might find yourself being carried by other members in your group — but at the very least, this build should keep you somewhat relevant in the early season, when your options are limited.
Leviathan (@LeviathanD3) is a content creator for Diablo Fans and a Hardcore Crusader for life. You can likely catch him streaming high Leaderboard/Conquest rank attempts unless he's out taking photographs or discovering new music.
Season 11 may still be a way off, but that doesn't mean we don't have plenty of new things to be hyped about in the meantime. The Rise of the Necromancer pack is a completely separate purchase from Patch 2.6, so even if you don't plan to buy into the new character, you're still in for plenty of treats. Here, you can check out details on the Necromancer class, as well as all of the new stuff coming in the patch — including Challenge Rifts, new zones in Adventure Mode, Realms of Fate, changes to Set Dungeons and Greater Rifts, and so much more.
Patch 2.6 will be going live today, June 27.
Leviathan (@LeviathanD3) is a content creator for Diablo Fans and a Hardcore Crusader for life. You can likely catch him streaming high Leaderboard/Conquest rank attempts unless he's out taking photographs or discovering new music.
It’s safe to say that Season 10 is right around its midpoint, and despite the trend of previous seasons, there seems to be a great number of active players still going strong. Patch 2.5.0 brought great quality-of-life changes and the Greater Rift meta has shifted a bit, so maybe this flurry of activity shouldn’t be so surprising. Let’s take a closer look at some of the factors that have contributed to making Season 10 so addictive.
1. The Armory
Heralded as one of the best quality-of-life changes the game has received in its five year history, the Armory has done wonders for allowing players to change their builds on the fly. Gone are the days of having to tell your friends to wait while you shift your set pieces around. Even worse was the strategy of making three or four characters of the same class to have different builds at the ready. Due to the Armory’s ease of use, players are tweaking their builds more than ever and setting aside particular pieces of gear to experiment with. This has propelled players to get more out of their season since the burden of making build changes manually has been lifted. It’s too easy not to save your main build and try something else out.
2. Primal Ancients
Nothing keeps you chasing loot like the promise of a perfect drop. While Primal Ancients had a rather contentious entrance, their second iteration was received in a more lukewarm fashion overall. Perhaps this was the wrong stance though, as many of the detractors of the second version, myself included, find the current Primal Ancient system at the crux of the reasons they continue to grind. At this point, any dedicated player is geared with well-rolled Ancient pieces, so Primal Ancients may not even represent that much of an upgrade. However, there is still something to be said for that excitement of getting exactly the piece you want with the exact affixes you want. Whether you’ve just found your first or fiftieth, Primal Ancients have definitely kept players hunting for longer than usual this season.
For those into the Greater Rift meta, Season 10 promised to be entertaining before it even started. Finally, the Monk would see its position as the boss killer challenged by new classes. The Lightning Hydra Wizard, a variant of the Lightning Wizard from Season 9, came about due to changes in the way the Manald Heal ring is procced in Patch 2.5.0. Several advocates for the class claimed that the Wizard would be the best choice come Season 10 for boss killing in 4-player groups. However, Shadows Impale Demon Hunters were receiving just the right amount of changes to their Holy Point Shot quiver to make the class a contender for the throne as well. The reality of the situation is that, currently, both classes are keeping up with one another exceedingly well at high-tier boss killing. The jury is still out as to which will reign supreme. Although, Demon Hunters seem to be more popular, perhaps due to Shadows being such a different playstyle for longtime Demon Hunter players. Variety is incredibly attractive, so this shakeup is likely driving motivation to push the Demon Hunter and the 4-man Greater Rift meta itself all the way to the end of the Season 10.
4. Legacy of Nightmares Spirit Barrage Witch Doctor
This build gets a talking point all of its own for a reason. Legacy of Nightmares Spirit Barrage has caused quite a stir due to the buggy interactions of Spirit Barrage’s Phantasm rune with pet-boosting items such as Mask of Jeram and the Enforcer gem. More notably, its lack of Area Damage has brought to light just how enjoyable high-tier Greater Rifting can be without lag caused by the server trying to keep up with Area Damage calculations. Blizzard recently confirmed that, despite the interaction being bugged, this build will not be modified by the developers. As a replacement for Arachyr Firebats Witch Doctors in the 4-man meta – one of the kings of massive Area Damage lag - this is a sigh of relief for players everywhere. Build diversity arising when no one predicted it or sniffed it out during the PTR is one of the best surprises.
Did I miss something that you’ve been surprised by this Season? Let us know in the comments section below.
Leviathan (@LeviathanD3) is a content creator for Diablo Fans and a Hardcore Crusader for life. You can likely catch him streaming high Leaderboard/Conquest rank attempts unless he's out taking photographs or discovering new music.
Patch 2.6 promises to kick Diablo 3 competition up a notch with the introduction of Challenge Rifts. The mode will give you a real player’s Greater Rift clear that you can take on in an attempt to beat their time. The layout of the Greater Rift, including the map, monsters, and pylons, will be exactly the same as the original player's experience. Additionally, you are given the exact character the original player used, and you'll use the same gear with all the same Legendary gems, Kanai’s Cube powers, and so on. The only thing you can change is the arrangement of the skills on your bar.
So, now that you know more about Challenge Rifts, we're going to discuss why should you be excited about this new feature.
1. New Build Discovery
If you’re the average player, you probably have a favorite class or two that you enjoy playing. Each season, you might contemplate changing it up a bit, but you always end up with your same Wizard or Monk at the end of the day. Challenge Rifts present a great opportunity to get you out of that rut, even if only temporarily. Since Challenge Rifts rotate through the different classes, you’ll have the chance to try out a build you may have no familiarity with, and you don’t have to commit any time to finding gear or coming up with ideas of how to put the skills together.
2. Short Term Commitment for Great Rewards
Challenge Rifts usually present a Greater Rift clear time of about 6 or 7 minutes by the original player. Since your goal is to beat their time, this means that you’ll spend maybe five minutes with that particular Challenge Rift if you're able to knock it out on your first try. For this small time investment, you’ll be rewarded with a Challenge Rift Cache. Inside of the cache are contents comparable to a full run of bounties on Torment VII. Currently on the Closed Beta, you receive 8 of each Legendary bounty material, 100-250 of each regular crafting material, 300 Blood Shards, and 4,000,000 gold. For people that don’t enjoy doing bounties, now you have another source of collecting similar rewards without traversing all of the Acts.
3. Balanced Competition Among Friends, Clanmates, and Regions
One of the major issues with current seasons is that those with the most consistent grind schedule, and therefore the most Paragon points, tend to be the ones occupying the top of the Leaderboards. With Challenge Rifts, there's no grinding involved. The time investment is initially very small, and if you’re a class expert for the current Challenge Rift, you may easily claim the #1 spot on the server-wide Leaderboard. After you meet the goal of beating the original player’s time, you can now work on improving your own time and see how your runs compare against others in the region, in your clan, or on your friends list. With thousands of players optimizing their runs, the top spots could come down to points of seconds, which should get any truly competitive player very excited to test their mettle without worrying about Paragon.
4. Community Involvement and Strategy Planning
Challenge Rifts provide an amazing opportunity for the community to build out additional resources that make the mode as robust as possible. For example, Desolacer put together the map shown above to indicate where the different Elite monsters are, as well as what the layout of what the Greater Rift looks like and where different pylons spawn. Information like this gives Challenge Rifts a more intense feel, as you now have a wealth of information at your fingertips and can better plan your way through attempts at creating the perfect run.
5. A Bright Future
What else can Challenge Rifts do? What if this mode becomes so popular that it feeds into other features like a Spectator Mode? What if we get Global Leaderboards with everyone compared from region to region? What if Challenge Rifts mirror seasonal play and a league develops where your placement in each Challenge Rift gives you a point total, and the person with the most points at the end wins the league? Challenge Rifts are still so young and their potential is quite vast, but early reports from most players reveal that they're surprisingly addicting to compete in. Perhaps the community and Blizzard can work hand-in-hand to take this excitement and evolve Challenge Rifts into one of the most entertaining ways to play Diablo III.
Do Challenge Rifts excite you? With more Closed Beta invites rolling out, have you had the chance to test them? What would you like to see the mode turn into? How would you improve it? Leave a comment below and let us know how you feel.
Leviathan (@LeviathanD3) is a content creator for Diablo Fans and a Hardcore Crusader for life. You can likely catch him streaming high Leaderboard/Conquest rank attempts unless he's out taking photographs or discovering new music.