Items
-
Head
-
Shoulders
-
Amulet
-
Torso
-
Wrists
-
Hands
-
Waist
-
Legs
-
Feet
-
Rings
-
Weapon
-
Offhand
Kanai's Cube
-
In-geom
-
Leoric's Crown
-
Mara's Kaleidoscope
Disclaimer: All credits to teambrg & Nanut. I just want to have a visual guide derived from their original builds that's why I created this. You can check their guides here http://teambrg.com/diablo-3/helltooth-set-dungeon-build-guide-mastery/ and here https://www.youtube.com/watch?v=V5kXOdkAE2E.
Options & Notes:
-Shukrani’s and In-geom are the only HIGH IMPACT items in this build!
-Cooldown reduction and movement speed are THE MOST IMPORTANT STATS.
-You need to be STRONG ENOUGH for one Wall to outright kill enemies (not hard).
-If you can one-shot elites much better.
-Manajuma's Way Set is a variant on weapon & off-hand gear. If you choose this set, swap the soul harvest to Hex - Angry Chicken for more mobility.
-You can also use illusory boots in the cube as a replacement on Leoric's Crown.
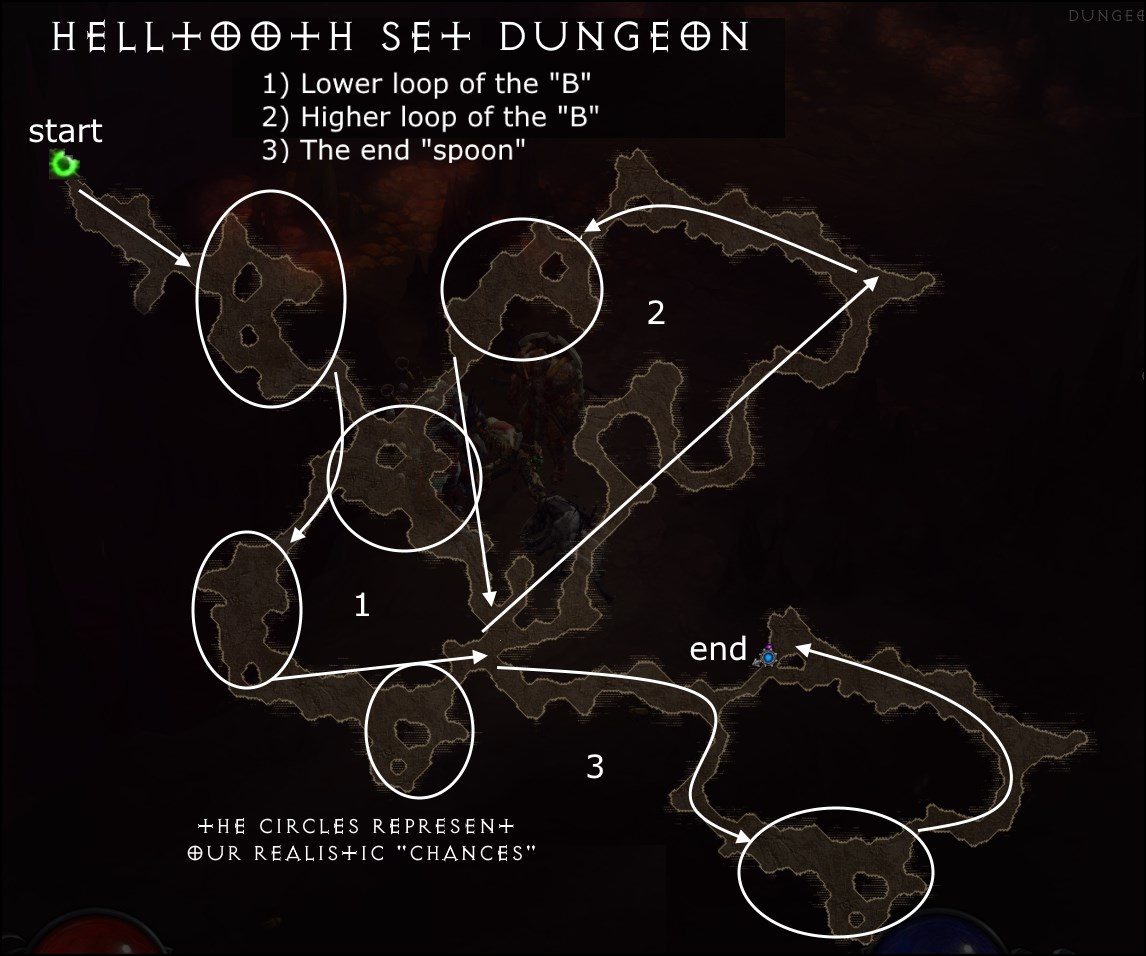
Helltooth Harness Set Dungeon Location & Map
Where’s the Helltooth Harness Set Dungeon? It’s located at the Royal Crypt.
-Teleport to way point ACT I - Royal Crypt.
-Keep going forward, it’s near Leoric’s boss room.
-You know the “gated room” before Leoric? enter that and the entrance is there!
The Helltooth Harness Set Dungeon Map / Layout?
How to Beat & Master Helltooth Harness Set Dungeon
This one can be frustrating but a neat trick is restarting when it seems bad early on!
Map & Pathing
-Familiarize yourself with the map first. A sample path is shown above.
-Open up and traverse towards the lower loop of the B.
-Complete the top half of the B.
-You’ll cross the “intersection” twice with this route, which is great since there’s a lot of straggler potential around that zone.
-Finish off with the right-hand “spoon”.
Tips & Explanations
(Objective) Kill X enemies with a single Wall of Death:
This can get very very frustrating. Keep in mind, that you do not have many opportunities to actually do this.
Try it in the rooms - not the hallways - as stated, there are small “rooms” where you have a better chance at this. FORCING it in the hallways will waste time, think of the hallways as a bonus! If it happens, great!
The first room should yield 1 - if not, I suggest a restart. If you get 2 in the first room or two, it’s a good spawn and should yield a clear! (I’ve gotten 2x in the first room a few times)
Why the poison rune? Well, for me it’s the best choice. It’s powerful and they only need to touch it once for its DoT to take effect. Others use cold or fire, feel free to experiment.
Make sure it kills: Jeram’s Bracers are the best “one item fix” for this. If you cannot reliably kill these guys with a single cast - you shouldn’t be here. Killing the elite with it is a luxury, but I managed to do it with Jeram cubed and a yellow bracer with + poison.
(Objective) Do not take any poison damage:
You can do this naturally if you like, but you won’t be very happy! With that being said I recommend using Mara’s Kaleidoscope. Call it a crutch, I ain’t here to discuss the “purity” of a set dungeon. You want an easier clear? Equip Mara’s and forget about this objective.
All in all, while a little frustrating, Helltooth set dungeon can be cleared in a few tries!
Paragon Priorities
Core
|
Movement Speed
|
|
Primary Stat
|
|
Vitality
|
|
Maximum Resource
|
Offense
|
Cooldown Reduction
|
|
Critical Hit Chance
|
|
Critical Hit Damage
|
|
Attack Speed
|
Defense
|
Armor
|
|
Life
|
|
Resist All
|
|
Life Regeneration
|
Utility
|
Area Damage
|
|
Resource Cost Reduction
|
|
Life on Hit
|
|
Gold Find
|
Build Guide
Disclaimer: All credits to teambrg & Nanut. I just want to have a visual guide derived from their original builds that's why I created this. You can check their guides here http://teambrg.com/diablo-3/helltooth-set-dungeon-build-guide-mastery/ and here https://www.youtube.com/watch?v=V5kXOdkAE2E.


Comments